Auto optimization automates the decision-making process while optimizing a campaign. The system will make decisions based on the optimization KPIs (Key Performance Indicators) defined by the user. Jivox dynamic campaigns can be auto-optimized to serve the best performing creatives based on a variety of metrics.
Let's set up a campaign using the Auto Optimization feature. Here, we'll create a campaign with the strategy described below.
MeowWoofShack, a retail pet-care brand, would like to use Jivox’s personalization and auto-optimization capabilities to create awareness for its brand. The campaign would target pet owner audiences in the US and showcase personalized products to them. The campaign would involve personalized product images and product prices that would be shown to different audiences. Multiple personalized creatives will be equally rotated for each audience segment and the campaign will be auto-optimized at real-time to promote the best performing creative variation.
Personalization Data Triggers used
- Audience Information - Puppy Owners, Adult Dog Owners, Kitten Owners and Adult Cat Owners
- Data Signal - DSP Data Signal
Dynamic Assets of the Ad
The ads would personalize the background image, copy, product image and product price.
Creative Master Design
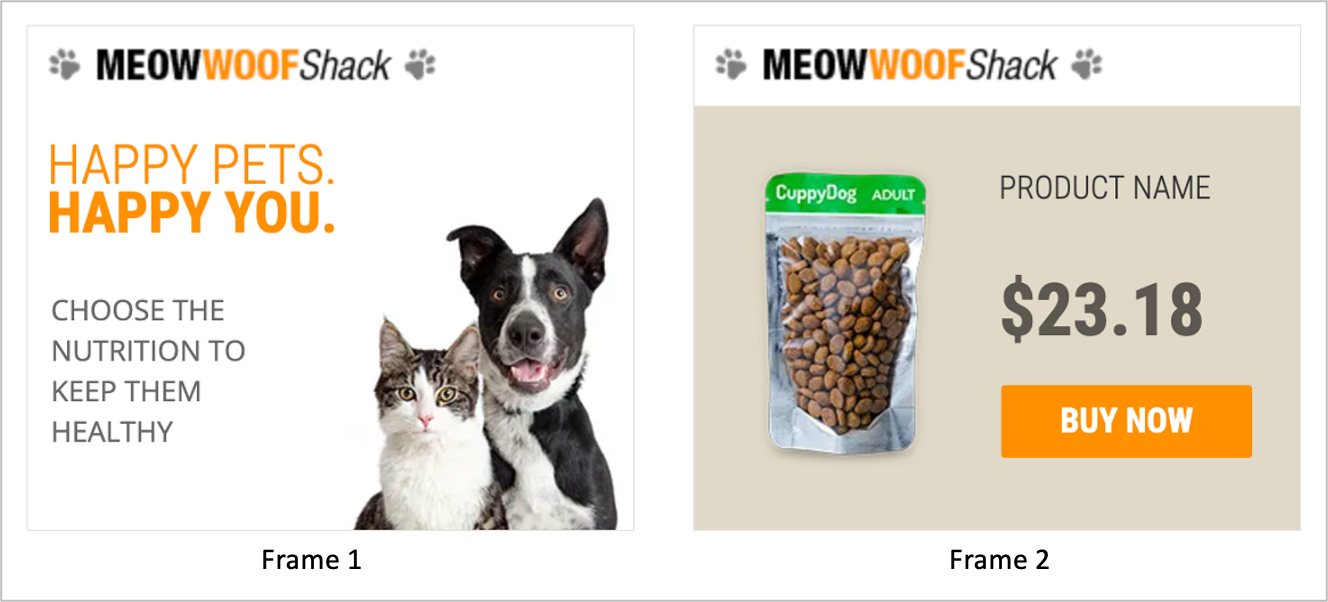
The Ad consists of two frames as shown in the image below. The background image, product image, copy and product price are personalized for the selected audience segments.
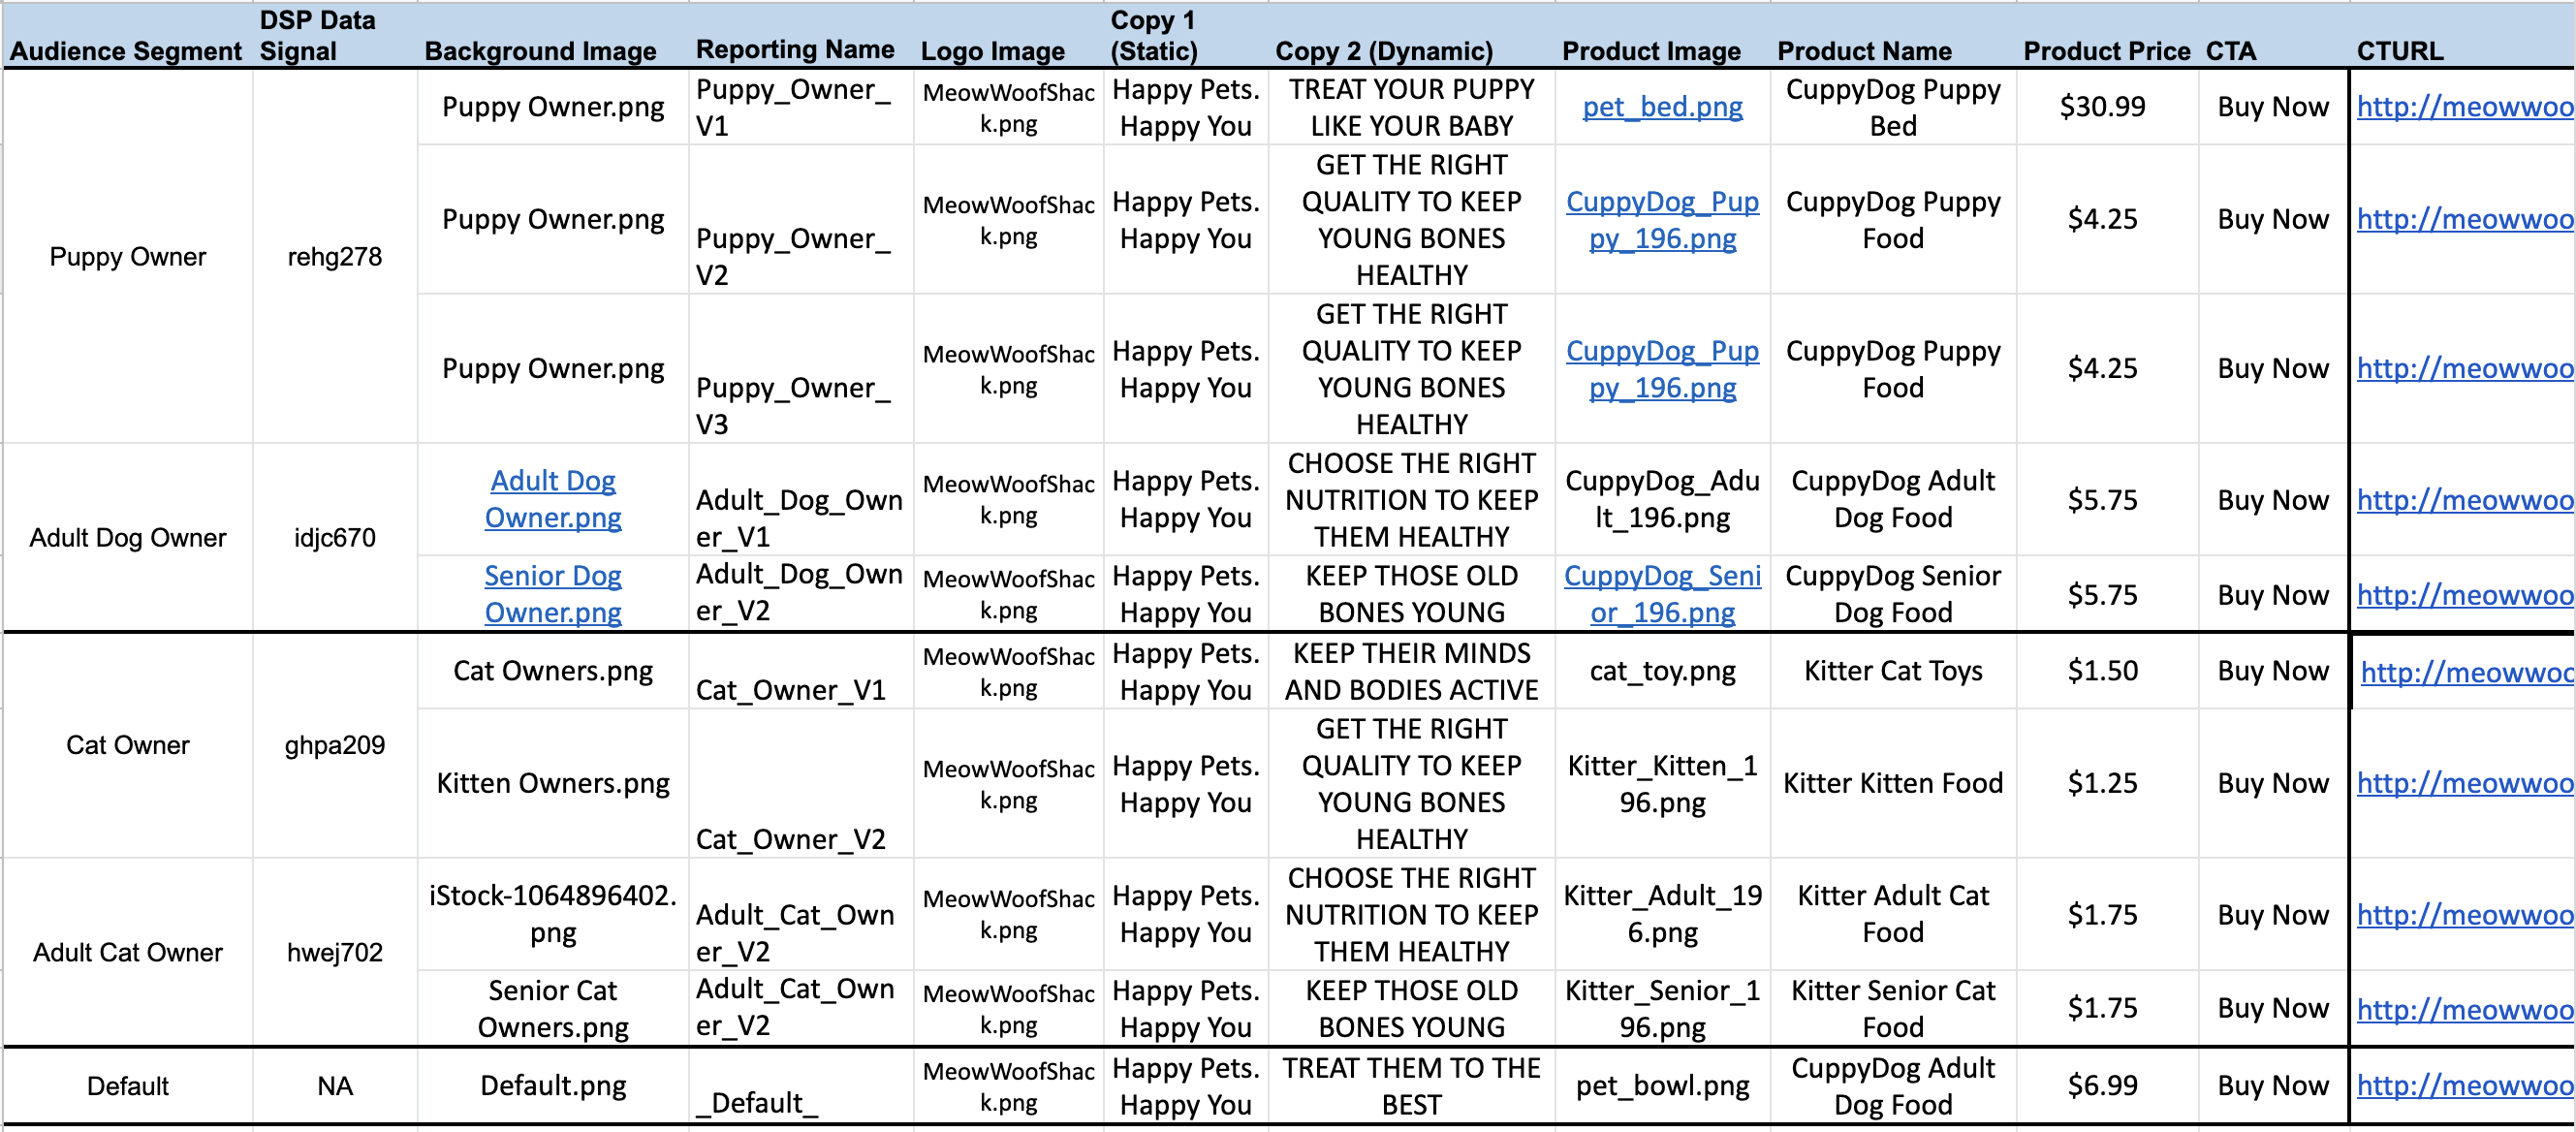
Below is the Mapping Document that defines the strategy for this campaign.
As you can see, the Mapping Document specifies the Background Image, Copy, Product Image, Product Price and other assets against each Audience Segment.
Make sure that the Creative Name in the Asset Source matches exactly with the Reporting Name here. This will help the system identify and serve the specific creatives that match the conditions.
You can download the mapping document from the Resource section below.
Using the information in the Mapping Document and Jivox's Dynamic Canvas Studio, the different creative variations have already been generated. If you haven't done this yet, check out the Creating a Display Ad section.
For this campaign, here's what the Asset Source looks like. As you can see, the Creative Name in the Asset Source is exactly same as the Reporting Name specified in the Mapping Document. The Creative Group is as per the Audience Segment.
You can download the Asset Source from the Resources section below.
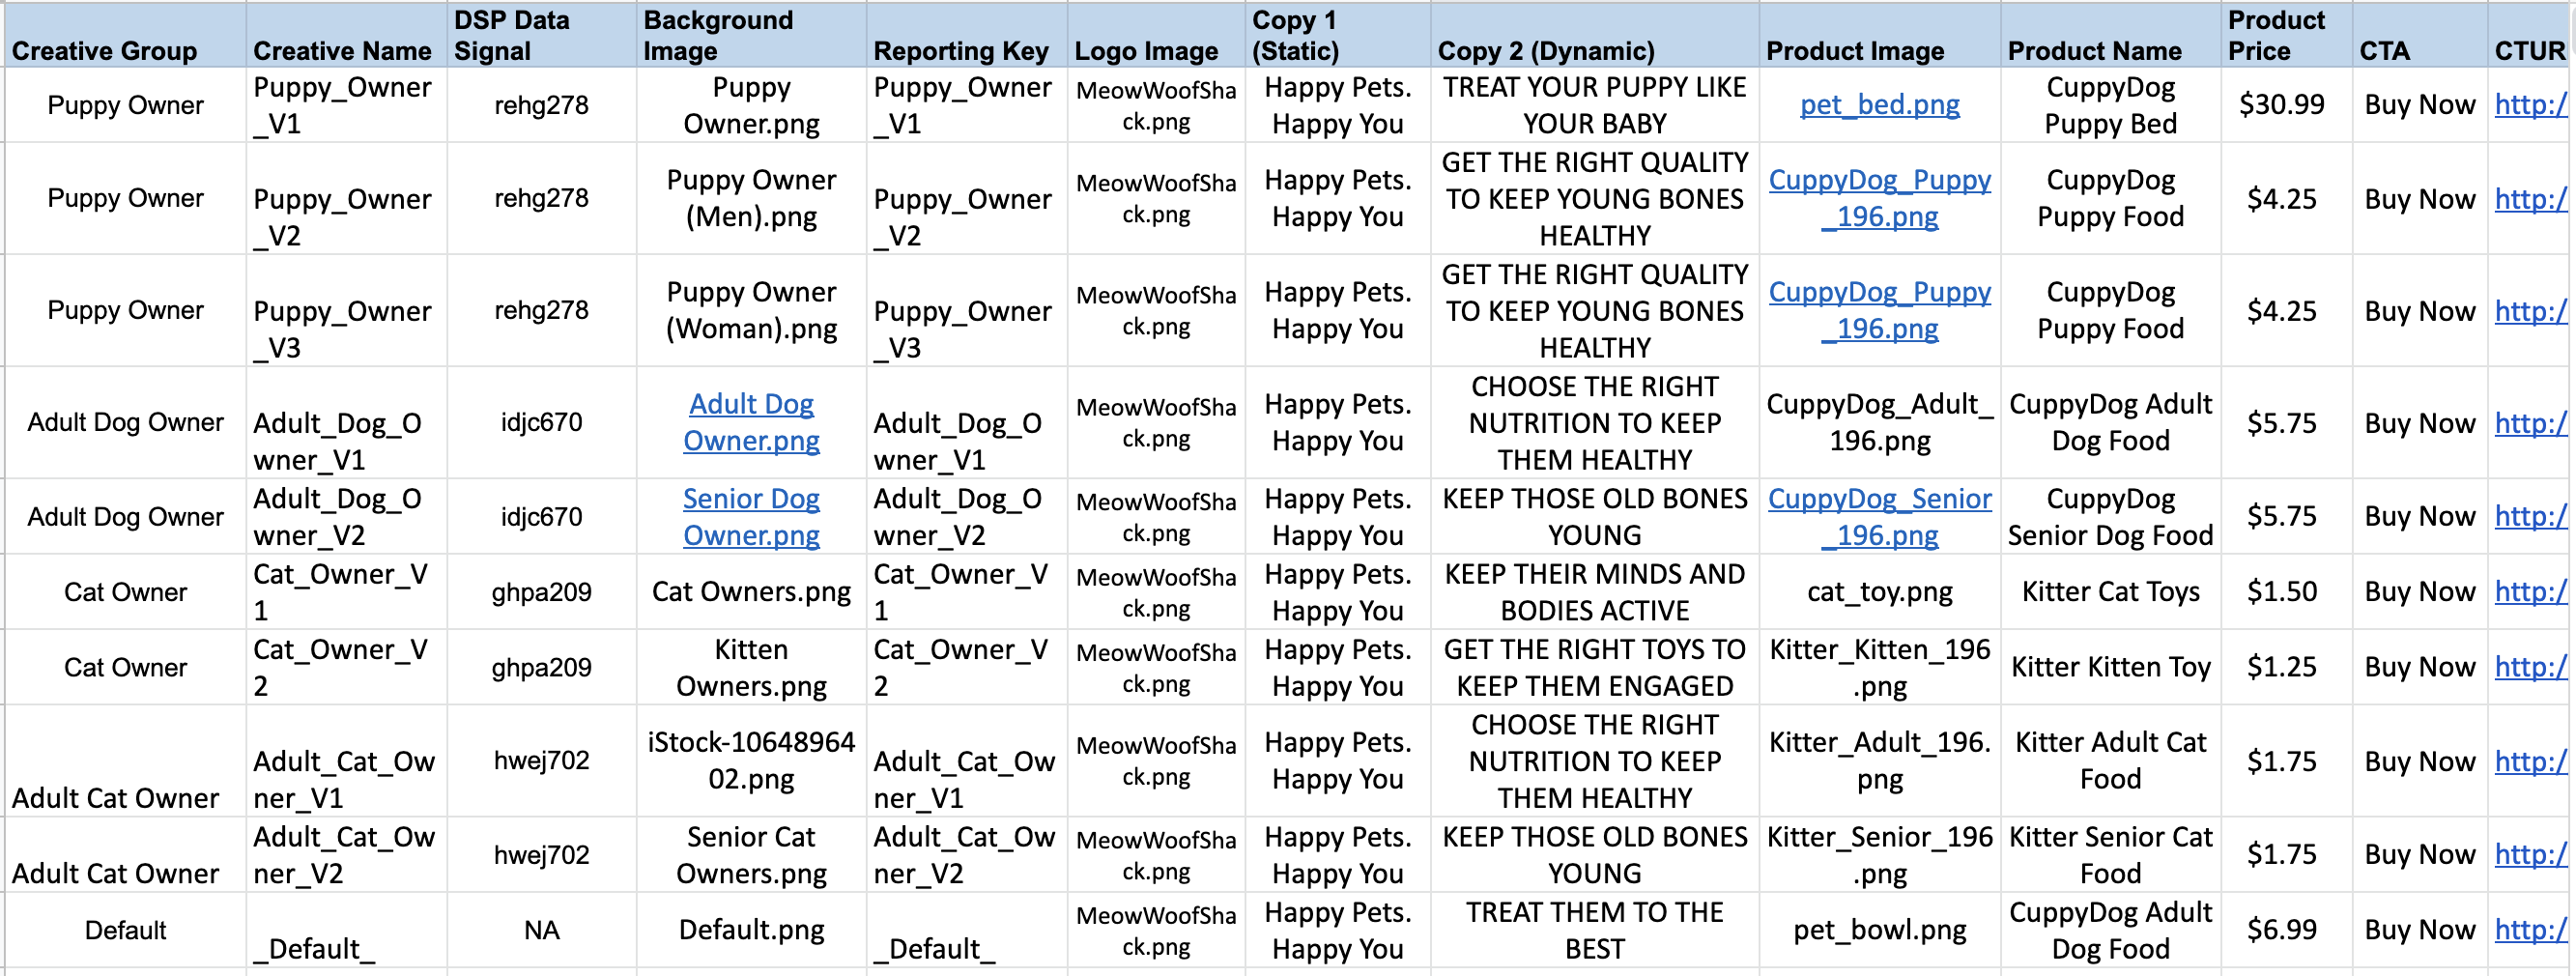
As you you can see, we have three different variations to be served for Puppy Owners. So, all the variations are grouped under Creative Group - Puppy Owners while each variation is named uniquely as per the audience segment for which it is served.
Setting Up the Campaign
Let's first select Create New Campaign on the Campaigns Dashboard to go to the Create Campaign page. On the Create Campaign page, select the ad for which you want to create the campaign in the Creative Masters field. You will see the Manage Segments tab under the Dynamic Campaign section.
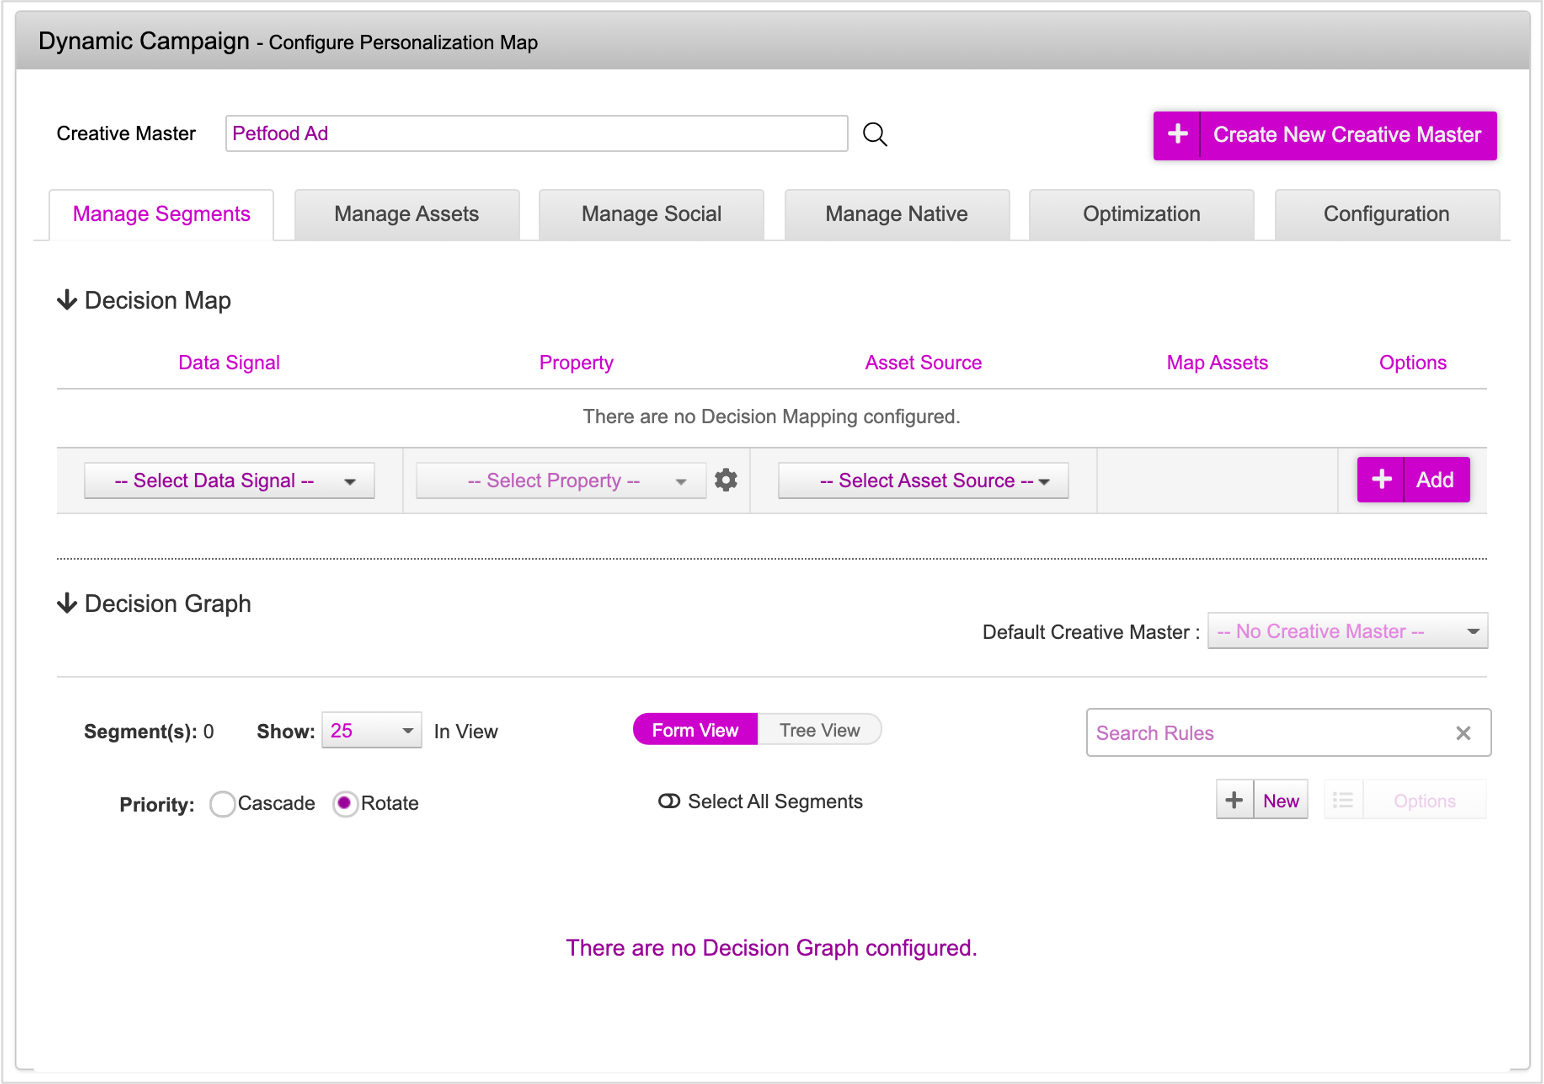
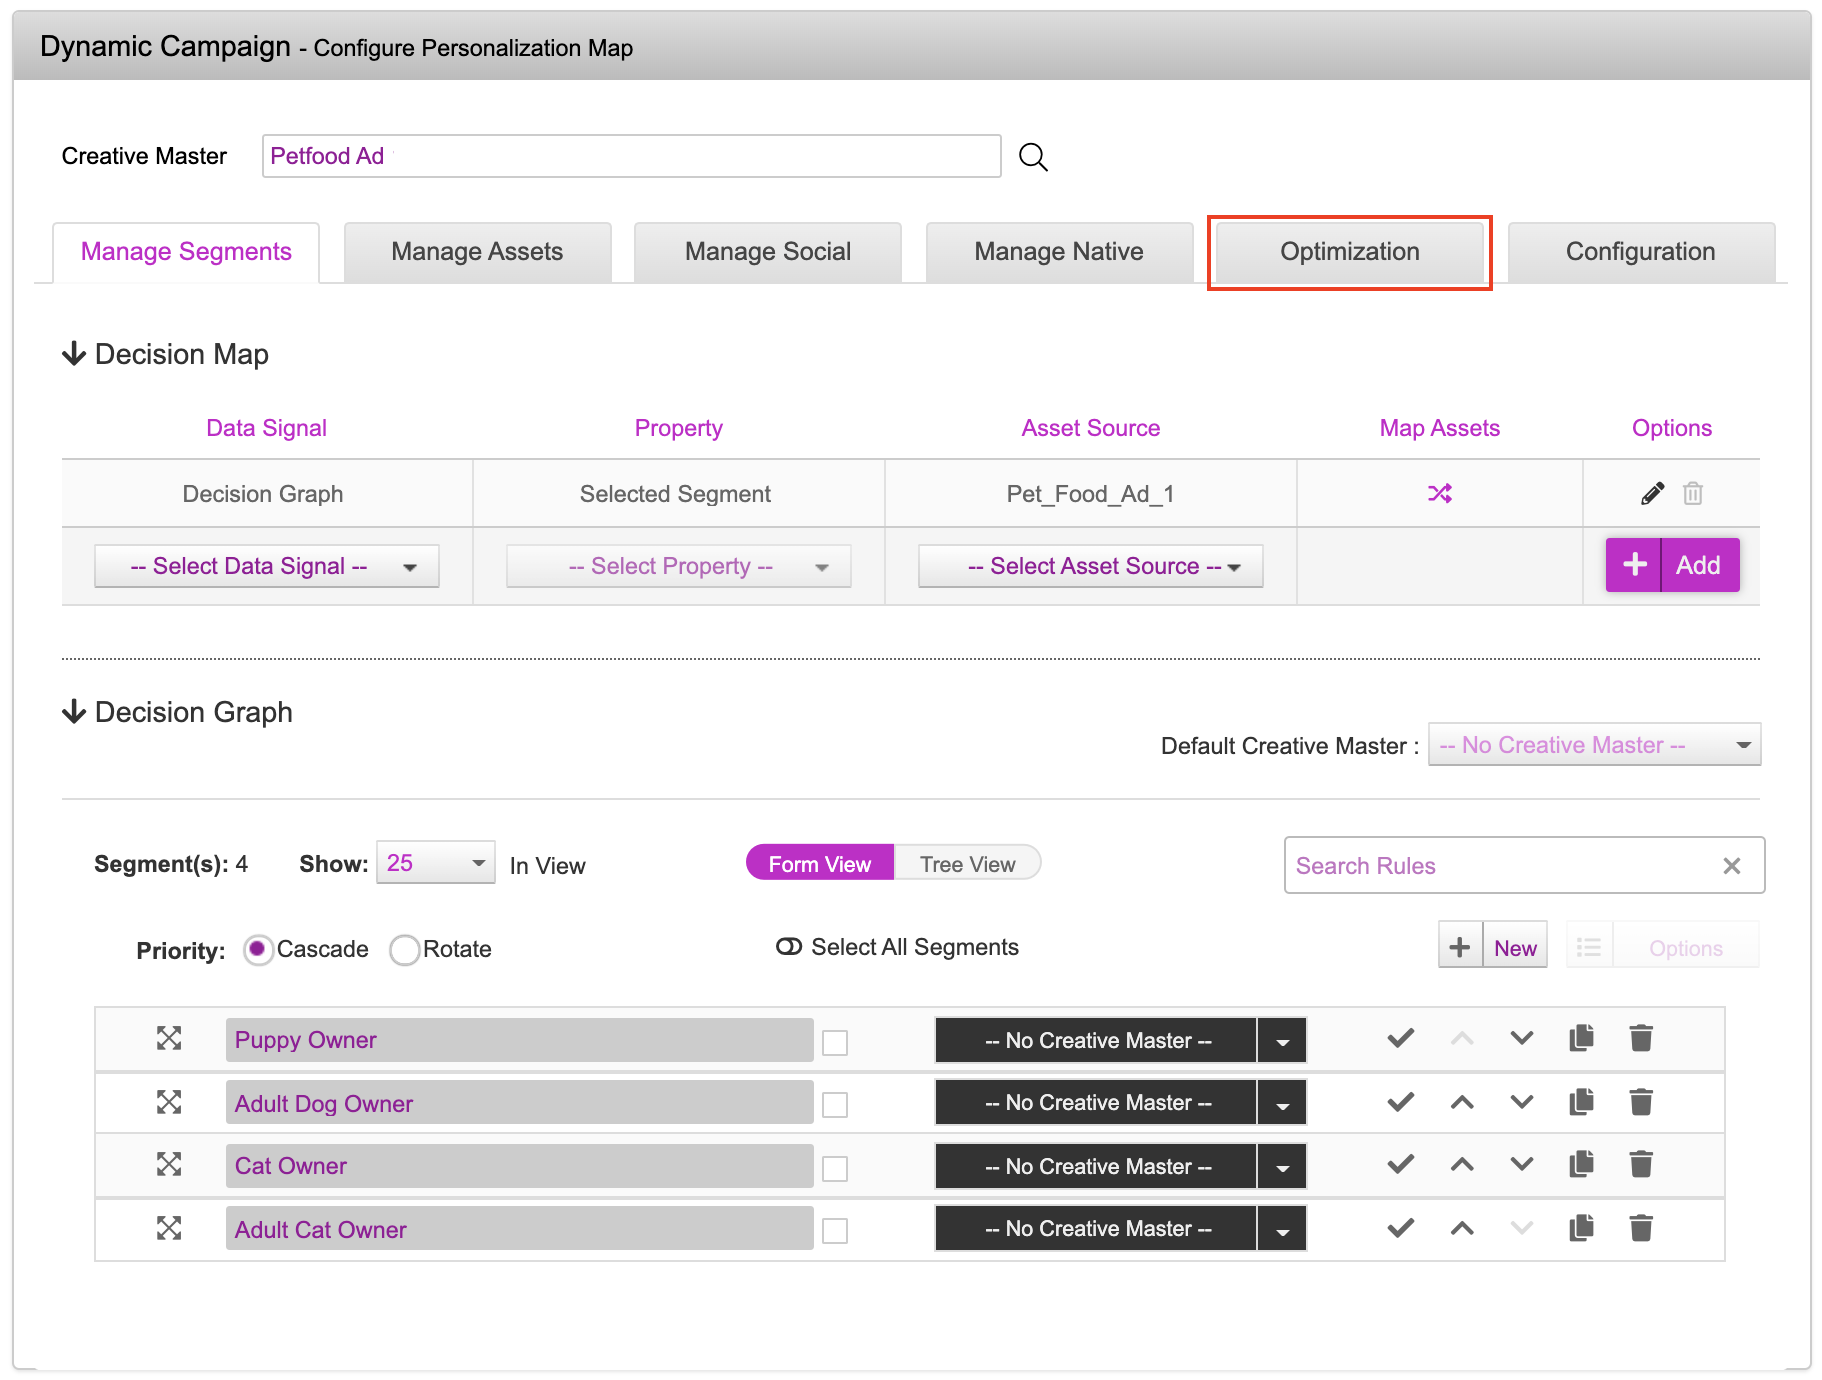
Here, we'll use a Decision Graph for this campaign.
1- Apply the below settings in the Update Assets section:
- Select Decision Graph as the Data Signal
- Keep the ‘Selected Segment’ property as is
- You can view all the mappings by clicking the icon in the Map Assets column.
Since we used DCS to create the Ad, the asset mapping process is completed in the ad section itself. You need not make any changes here.
2- Click Update. The asset source and data signal mapping process is now complete and the Decision Map is configured.
3- Next, let's scroll down to the Decision Graph section, and set the Priority to Rotate. Make sure the Priority is set to Rotate for auto-optimization to work.
4- Click the New button to add Segments.
We will create 4 segments, one for each Creative Group.
Ensure that the segment name exactly matches the Creative Group in the Asset Source. To avoid making any error, copy the Creative Name from the Asset Source and paste it directly to the Segment.

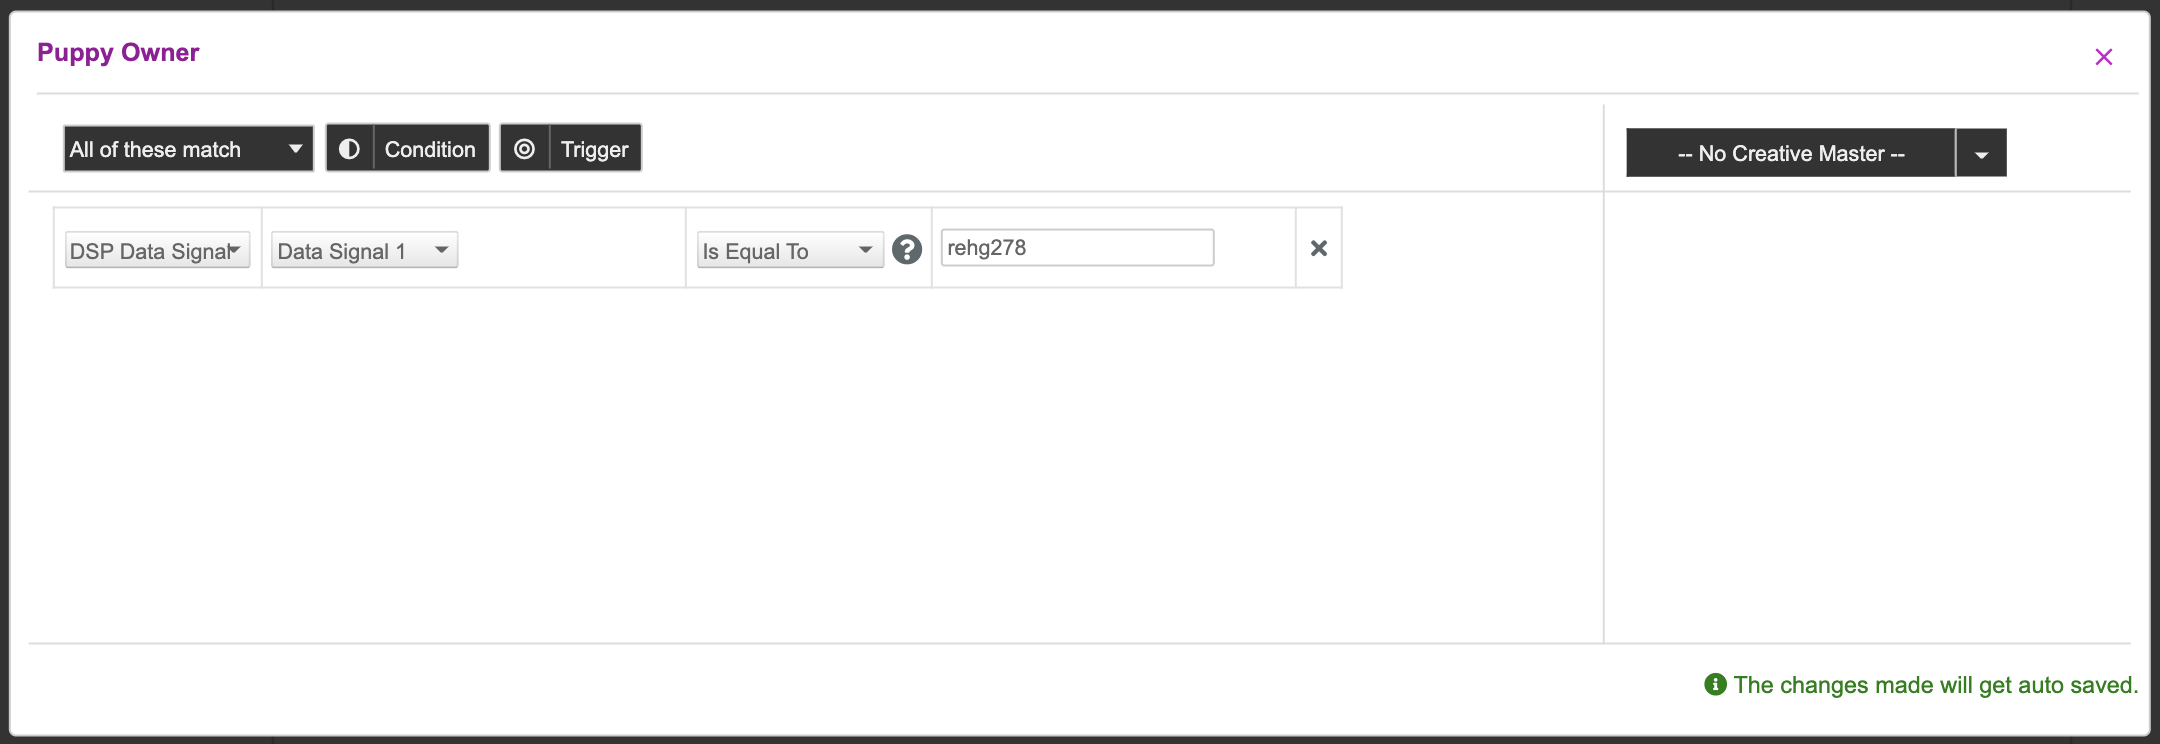
For each segment, define the conditions and triggers as shown below.
| Condition - All of these Match |
|---|
| DSP Data Signal || Data Signal 1 || Is Equal To || {Data Signal ID} |
Make sure you enter the exact DSP Data Signal ID as defined in the Mapping Document for each segment.
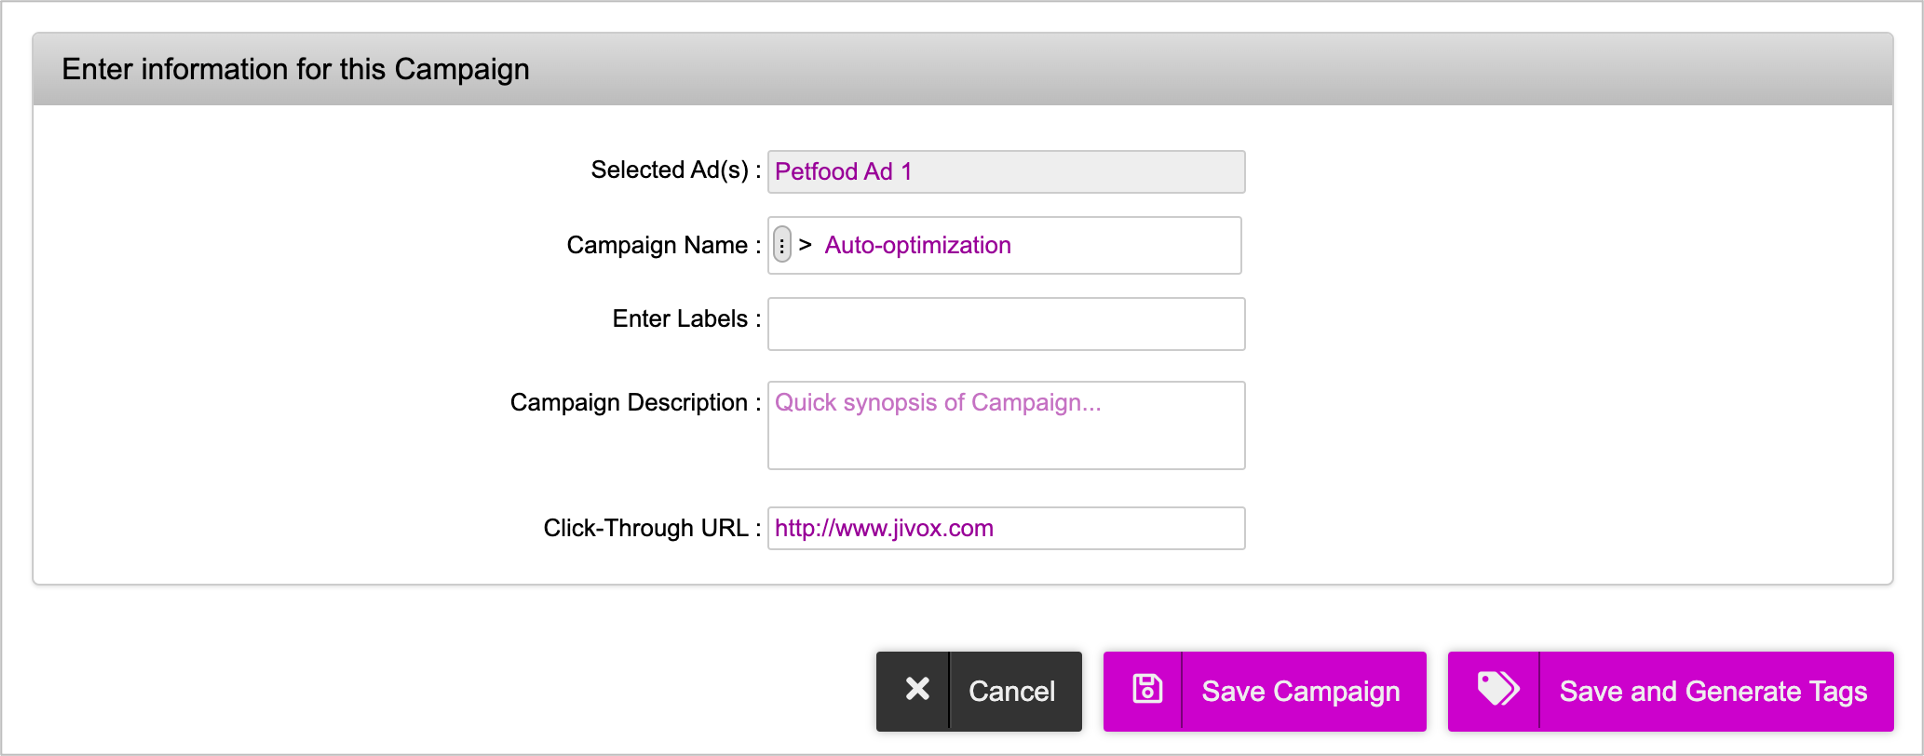
The last step on the campaign setup is to save the campaign. Once you are done, scroll down, and update the Campaign Name as required. By default, the campaign will be named based on the Ad that you have selected. Enter a Click-Through URL and click Save Campaign.
Setting Up Auto Optimization
Once you have setup the campaign based on the data above, we can now ahead and setup auto optimization.
There are two control parameters to Auto Optimization:
- Optimization Threshold: The number of campaign impressions served before the auto optimization is applied.
- Reserve Ratio: The percentage of impressions that are served for each creative variant, without optimization. The reserve ratio applies after the campaign has served the impressions set in the Optimization threshold. The ratio is applied to all subsequent impressions served. Those number of impressions are served as if there was no optimization defined in the campaign. For example, consider a campaign with three creative variants in equal rotation. When a reserve ratio of 10% is set, and the campaign serves 100K impressions in a day, 10K impressions will be served using the equal rotation model and 90K will be served with the creative variant as identified by the optimizer.
Let's now specify the auto optimization settings:
1- On the Campaigns Dashboards page, select the campaign that you want to optimize and click the Edit icon.
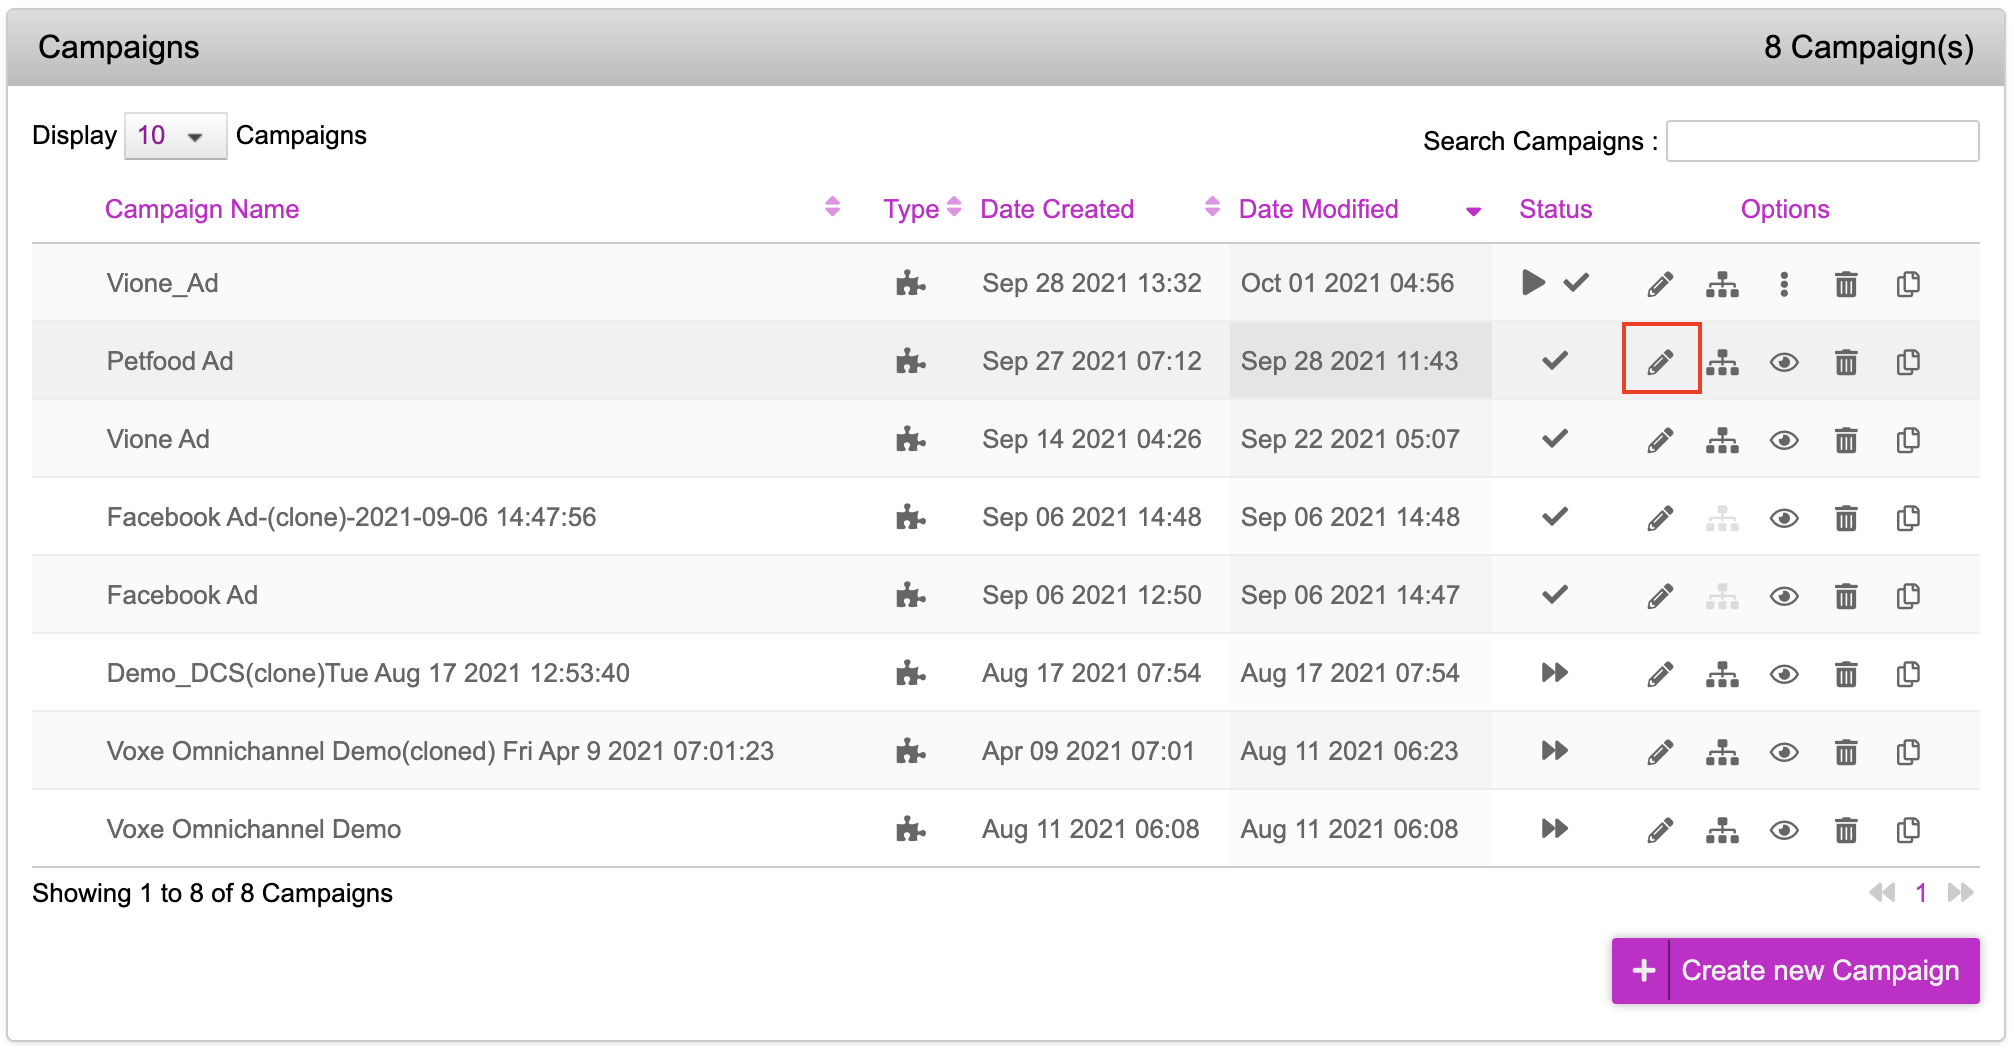
Your Campaign will be displayed.
2- Click the Optimization tab. The Auto Optimization tab is displayed.
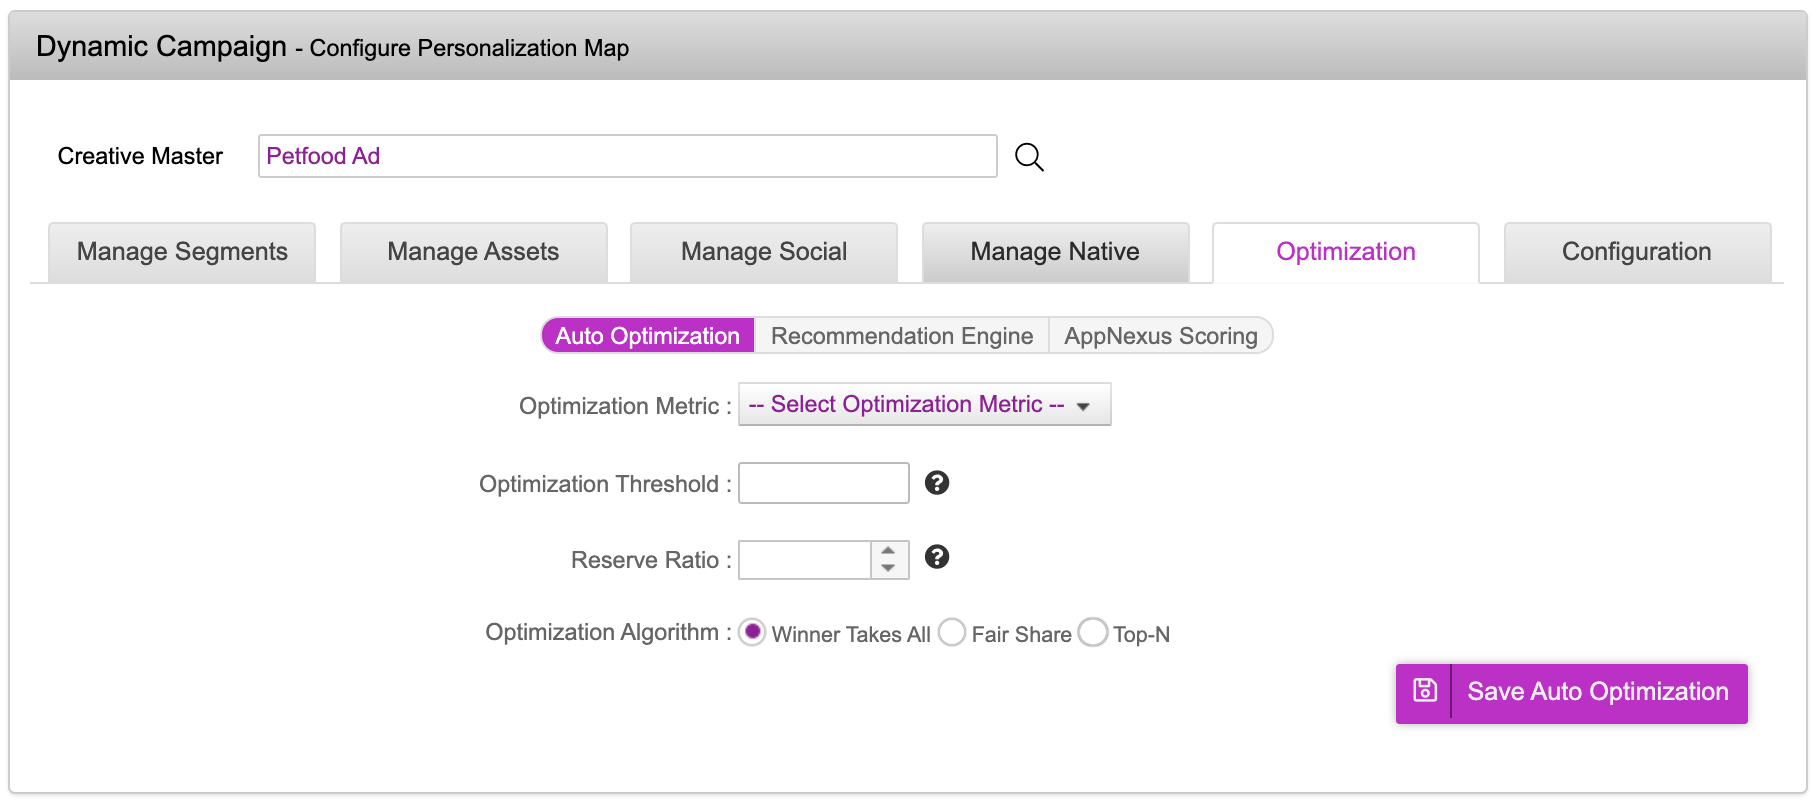
3- Under Optimization Metric, select the KPI to use for optimization.
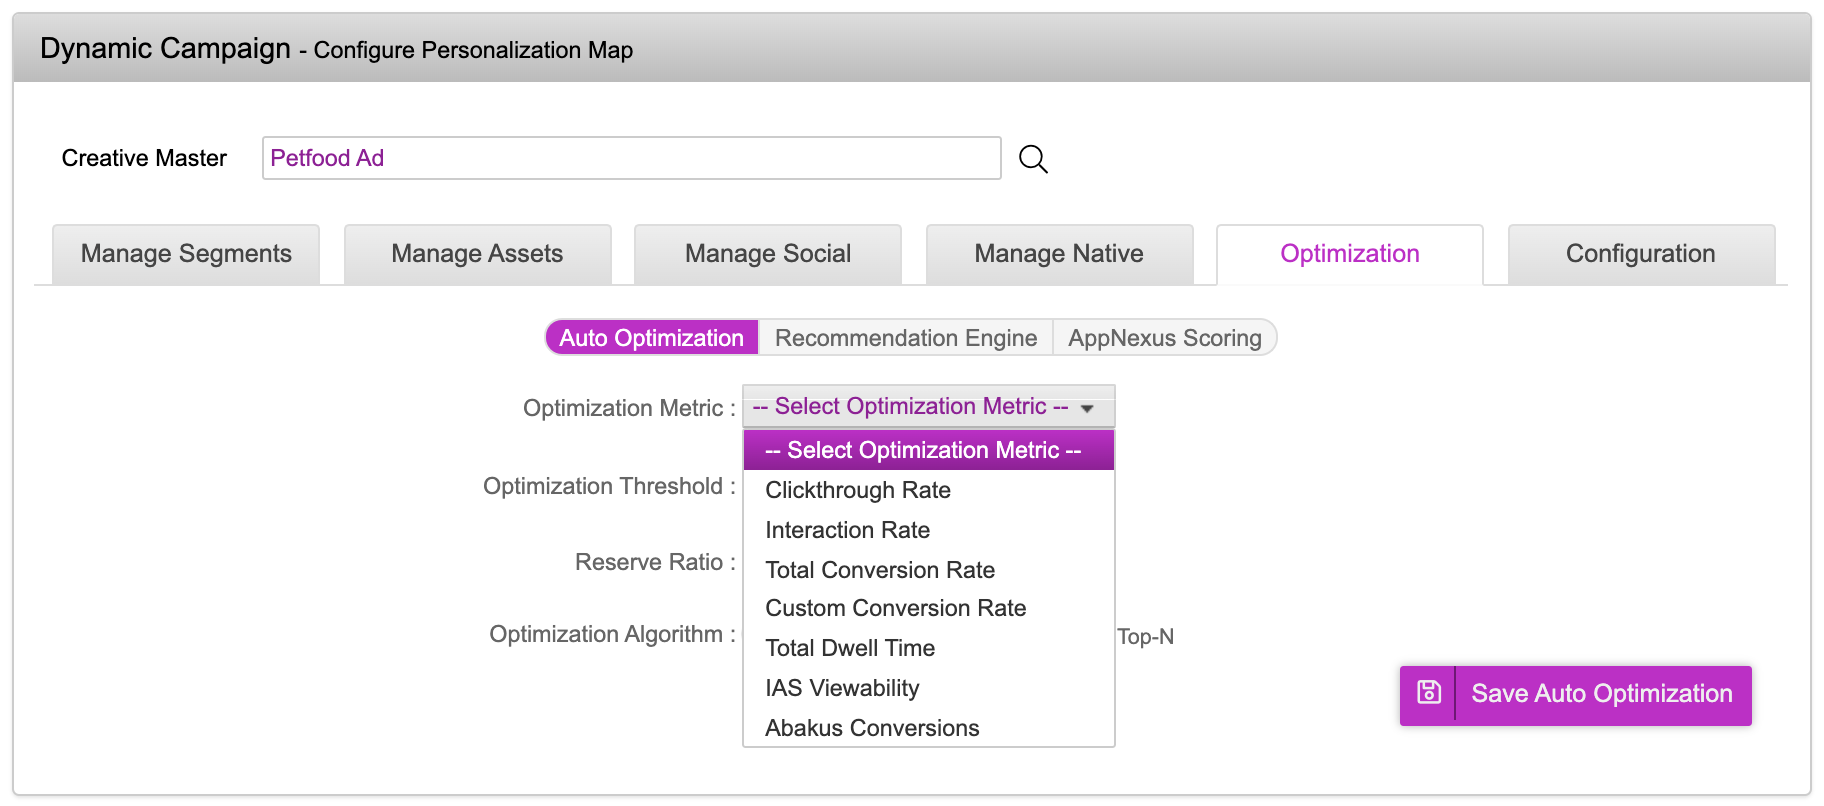
- Clickthrough Rate (CTR): CTR is the number of clicks that your ad receives divided by the number of times your ad is shown (Clicks ÷ Impressions = CTR). For example, if you had 5 clicks and the ad was shown 100 times (impressions), then your CTR would be 5%. If selected, Jivox IQ optimizes the rotation using the clickthrough rate (CTR) as the KPI.
- Interaction Rate: Interaction Rate indicates how often people interact with your ad after it’s shown to them. This is measured by dividing the number of interactions with your ad by the number of times your ad is shown. You can use it to help you figure out how effective your advertising is. For example, if you have 10 interactions and 1,000 impressions, then your interaction rate is 1%. If selected, Jivox IQ optimizes the rotation using the overall interaction rate as the KPI.
- Total Conversion Rate: Total conversion rate is the ratio between conversions recorded due to creative variant and the number of times it was loaded. Conversion rates are calculated by simply taking the number of[Conversion rates are calculated by simply taking the number of conversions and dividing that by the number of total ad interactions that can be tracked to a conversion during the same time period. For example, if you had 50 conversions from 1,000 interactions, your conversion rate would be 5%, since 50 ÷ 1,000 = 5%.(Conversion rates are calculated by simply taking the number of conversions and dividing that by the number of total ad interactions that can be tracked to a conversion during the same time period. For example, if you had 50 conversions from 1,000 interactions, your conversion rate would be 5%, since 50 ÷ 1,000 = 5%.) conversions and dividing that by the number of total ad interactions that can be tracked to a conversion during the same time period. For example, if you had 50 conversions from 1,000 interactions, your conversion rate would be 5%, since 50 ÷ 1,000 = 5%. If selected, Jivox IQ optimizes the rotation using the total conversion rate as the KPI.
- Custom Conversion Rate: Jivox can also set up campaigns to surface a custom KPI defined by your Marketing team and use it to automatically optimize Jivox campaigns. Custom conversion rate is the ratio between conversions recorded (for the custom event types defined in configuration) due to creative variant and the number of times it was loaded.
- Total Dwell Time: Total Dwell Time is based on the time spent by the user while interacting with the ad unit (User hovered over the ad unit and parked the mouse for at least 0.5 seconds over the ad unit). If selected, Jivox IQ optimizes the rotation using the total dwell time as the KPI.
- IAS Viewability: IAS viewability metric is recorded once per session if the ad is in view. So based on ratio of number of times this metric is recorded for creative variant with the creative load count, optimization is performed. If selected, Jivox IQ optimizes the rotation based on the Integral Ad Science (IAS) viewability measurement as the KPI.
- Abakus Conversions: Optimizes the rotation using the Abacus conversion rate as the KPI.

Since ours is an awareness campaign, for this strategy, we will select Clickthrough Rate.
4- Enter a number for the Optimization Threshold.
This determines the total number of impressions served before the optimization algorithm is applied. An optimal value depends on the number of creative variants used in the campaign and allows all variants to serve enough impressions so that the relative performance can be measured. Typical values range from 100,000 to 1,000,000 impressions.
5- Enter a percentage for the Reserve Ratio.
This determines the minimum percentage of impressions served unoptimized from the pool of creative variants used in the campaign, to ensure that the campaign performance is being continuously sampled. Jivox recommends this to be set at 20%.
6- Select the Optimization Algorithm you want to apply after Optimization Threshold is reached:
- Winner Takes All: Optimized to the creative variant that has the best performance. For example, if you set a reserve ratio of 10% and creative A has the best performance (based on the KPI configured above), 10% of the impressions will serve a rotation of all variants, and 90% impressions will serve creative A.
- Fair Share: Optimized to a proportional share of the creative variants. For example, if creative variant A has a CTR of 0.08 and creative B has a CTR of 0.16, 90% (based on the 10% recommended reserve ratio) of the impressions can serve a mix of creative A and B, with A serving half as many impressions as B.
- Top-N: Optimized to return the top N number of performing creative variations from the campaign. N is the number of variations returned. These variations can be across multiple segments in the campaign. For example, top 3 creative variants of a campaign are returned based on optimization metric.
Winner Takes All returns the top performing creative variant after the Optimization Threshold is reached. In Fair Share, the creative variants are returned based on the ratio of the selected metric, whereas, in Top-N, the top N creative variants are returned in equal rotations. In all three scenarios, the reserve ratio ensures that creative variants are returned randomly based on the defined percentage.
7- Click Save Auto Optimization. Your auto optimization settings are now configured and applied to the dynamic campaign.
Next Steps
Here's what you must do next.
- Generate the Creative Preview and send it for approvals if required.
- Generate Tags
- Third Party Trackers
- Configuring Publisher and Placement
If you want to generate multiple tags at once, use the Bulk Tag Generation feature.